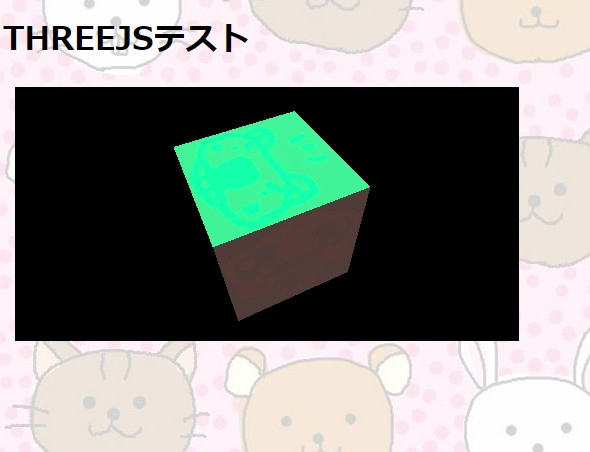
・./test3js.htm
<!DOCTYPE html>
<html lang="ja">
<head>
<title>THREEJSテスト</title>
  <meta charset="UTF-8" />
  <script src="./javascripts/nas6lib/timer.js"></script>
  <script src="./javascripts/threejs/three.js"></script>

<script>

window.addEventListener("DOMContentLoaded", init);
var TMan = new N6LTimerMan();  //タイマーマネージャー

function init() {
  const width = 500;
  const height = 250;

  const renderer = new THREE.WebGLRenderer({
    canvas: document.querySelector("#cnv0")
  });
  renderer.setPixelRatio(window.devicePixelRatio);
  renderer.setSize(width, height);
  const scene = new THREE.Scene();
  const camera = new THREE.PerspectiveCamera(
    45,
    width / height,
    1,
    10000
  );
  camera.position.set(0, 0, 20);

  // 箱を作成
  const geometry = new THREE.BoxGeometry(5, 5, 5);
  const loader = new THREE.TextureLoader();
  const texture = loader.load('./img/koala.jpg');
  const textureF = loader.load('./img/koalaF.jpg');
  // マテリアルにテクスチャーを設定
  const materials = [
    new THREE.MeshStandardMaterial({map: textureF}),
    new THREE.MeshStandardMaterial({map: texture}),
    new THREE.MeshStandardMaterial({map: texture}),
    new THREE.MeshStandardMaterial({map: texture}),
    new THREE.MeshStandardMaterial({map: texture}),
    new THREE.MeshStandardMaterial({map: texture})
  ];
  // メッシュを作成
  const box = new THREE.Mesh(geometry, materials);
  box.position.set(0, 0, 8);
  scene.add(box);

  // 平行光源
  const light = new THREE.DirectionalLight(0xffffff);
  light.intensity = 2; // 光の強さを倍に
  light.position.set(1, 1, 1);
  // シーンに追加
  scene.add(light);

  TMan.add();
  TMan.timer[0].setalerm(function() { Loop(0); }, 50);  //メインループセット


  function Loop(id) {

    box.rotation.x += 1.0 * Math.PI / 180.0;//x軸回りに1度回転
    box.rotation.y += 2.0 * Math.PI / 180.0;//y軸回りに2度回転
    box.rotation.z += 3.0 * Math.PI / 180.0;//z軸回りに3度回転

    // レンダリング
    renderer.render(scene, camera);

    TMan.timer[id].setalerm(function() { Loop(id); }, 50);  //メインループセット
  }

<!--
/*
  // 初回実行
  Loop();

  function Loop() {
    requestAnimationFrame(Loop);

    box.rotation.x += 1.0 * Math.PI / 180.0;//x軸回りに1度回転
    box.rotation.y += 2.0 * Math.PI / 180.0;//y軸回りに2度回転
    box.rotation.z += 3.0 * Math.PI / 180.0;//z軸回りに3度回転

    renderer.render(scene, camera);
  }
*/
//-->

}

</script>

<style>
article, aside, dialog, figure, footer, header,
hgroup, menu, nav, section { display: block; }
#cnv0{
    position: absolute;
    float: left;
    top: 640px;
    left: 20px;
    background:#8080b0;
    border: 2px #000000 solid;
}
</style>

</head>

<body text="black" link="#3333cc" vlink="#663399" alink="#cc0000" bgcolor="#faebf1" background="./img/kumausagineko.jpg">
<font size="3">
<br>
<br>
<b>
<h1>THREEJSテスト</h1>
<br>
<div style = 'width:500px; height:250px; border: 0px; overflow:hidden;'>
  <canvas id="cnv0" name="cnv0" width="500" height="250"></canvas>
</div>
<br>
<br>
<br>
</b>
</font>
<br>
<br>
<hr>
<br>
<br>
<a href="./index.htm">戻る</a><br>
<br>
<br>
</body>
</html>
・ヘッダの書き方
<!DOCTYPE html>
<html lang="ja">
<head>
<title>タイトルを入れてください</title>
  <meta charset="UTF-8" />

// ……… 中 略 ………

</head>
・コンポーネントの登録
  <script src="./javascripts/nas6lib/timer.js"></script>
  <script src="./javascripts/threejs/three.js"></script>
・スタイルシート
<style>
article, aside, dialog, figure, footer, header,
hgroup, menu, nav, section { display: block; }
#cnv0{
    position: absolute;
    float: left;
    top: 640px;
    left: 20px;
    background:#8080b0;
    border: 2px #000000 solid;
}
</style>
・ターゲットキャンバス
<div style = 'width:500px; height:250px; border: 0px; overflow:hidden;'>
  <canvas id="cnv0" name="cnv0" width="500" height="250"></canvas>
</div>
・スクリプト部分
<script>

window.addEventListener("DOMContentLoaded", init);
var TMan = new N6LTimerMan();  //タイマーマネージャー

function init() {
  const width = 500;
  const height = 250;

  const renderer = new THREE.WebGLRenderer({
    canvas: document.querySelector("#cnv0")
  });
  renderer.setPixelRatio(window.devicePixelRatio);
  renderer.setSize(width, height);
  const scene = new THREE.Scene();
  const camera = new THREE.PerspectiveCamera(
    45,
    width / height,
    1,
    10000
  );
  camera.position.set(0, 0, 20);

  // 箱を作成
  const geometry = new THREE.BoxGeometry(5, 5, 5);
  const loader = new THREE.TextureLoader();
  const texture = loader.load('./img/koala.jpg');
  const textureF = loader.load('./img/koalaF.jpg');
  // マテリアルにテクスチャーを設定
  const materials = [
    new THREE.MeshStandardMaterial({map: textureF}),
    new THREE.MeshStandardMaterial({map: texture}),
    new THREE.MeshStandardMaterial({map: texture}),
    new THREE.MeshStandardMaterial({map: texture}),
    new THREE.MeshStandardMaterial({map: texture}),
    new THREE.MeshStandardMaterial({map: texture})
  ];
  // メッシュを作成
  const box = new THREE.Mesh(geometry, materials);
  box.position.set(0, 0, 8);
  scene.add(box);

  // 平行光源
  const light = new THREE.DirectionalLight(0xffffff);
  light.intensity = 2; // 光の強さを倍に
  light.position.set(1, 1, 1);
  // シーンに追加
  scene.add(light);

  TMan.add();
  TMan.timer[0].setalerm(function() { Loop(0); }, 50);  //メインループセット


  function Loop(id) {

    box.rotation.x += 1.0 * Math.PI / 180.0;//x軸回りに1度回転
    box.rotation.y += 2.0 * Math.PI / 180.0;//y軸回りに2度回転
    box.rotation.z += 3.0 * Math.PI / 180.0;//z軸回りに3度回転

    // レンダリング
    renderer.render(scene, camera);

    TMan.timer[id].setalerm(function() { Loop(id); }, 50);  //メインループセット
  }

<!--
/*
  // 初回実行
  Loop();

  function Loop() {
    requestAnimationFrame(Loop);

    box.rotation.x += 1.0 * Math.PI / 180.0;//x軸回りに1度回転
    box.rotation.y += 2.0 * Math.PI / 180.0;//y軸回りに2度回転
    box.rotation.z += 3.0 * Math.PI / 180.0;//z軸回りに3度回転

    renderer.render(scene, camera);
  }
*/
//-->

}

</script>
・./fps60.htm
<!DOCTYPE html>
<html lang="ja">
<head>
<title>60FPSテスト</title>
  <meta charset="UTF-8" />
  <script src="./javascripts/nas6lib/timer.js"></script>
  <script src="./javascripts/threejs/three.js"></script>

<script>

window.addEventListener("DOMContentLoaded", init);
var TMan = new N6LTimerMan();  //タイマーマネージャー
var f = 0;
var dt = Math.floor(1000 / 60);


function FPSLoop(id) {
   txt = document.querySelector("#fps");
   txt.value = f;
   f = 0;
   TMan.timer[id].setalerm(function() { FPSLoop(id); }, 1000);
}

function init() {
  const width = 500;
  const height = 250;

  const renderer = new THREE.WebGLRenderer({
    canvas: document.querySelector("#cnv0")
  });
  renderer.setPixelRatio(window.devicePixelRatio);
  renderer.setSize(width, height);
  const scene = new THREE.Scene();
  const camera = new THREE.PerspectiveCamera(
    45,
    width / height,
    1,
    10000
  );
  camera.position.set(0, 0, 20);

  // 箱を作成
  const geometry = new THREE.BoxGeometry(5, 5, 5);
  const loader = new THREE.TextureLoader();
  const texture = loader.load('./img/koala.jpg');
  const textureF = loader.load('./img/koalaF.jpg');
  // マテリアルにテクスチャーを設定
  const materials = [
    new THREE.MeshStandardMaterial({map: textureF}),
    new THREE.MeshStandardMaterial({map: texture}),
    new THREE.MeshStandardMaterial({map: texture}),
    new THREE.MeshStandardMaterial({map: texture}),
    new THREE.MeshStandardMaterial({map: texture}),
    new THREE.MeshStandardMaterial({map: texture})
  ];
  // メッシュを作成
  const box = new THREE.Mesh(geometry, materials);
  box.position.set(0, 0, 8);
  scene.add(box);

  // 平行光源
  const light = new THREE.DirectionalLight(0xffffff);
  light.intensity = 2; // 光の強さを倍に
  light.position.set(1, 1, 1);
  // シーンに追加
  scene.add(light);


  TMan.changeinterval(dt / 2); //タイマーチェック間隔変更

  TMan.add();
  TMan.timer[0].setalerm(function() { Loop(0); }, dt);  //メインループセット
  TMan.add();
  TMan.timer[1].setalerm(function() { FPSLoop(1); }, 1000);  //1sループセット


  function Loop(id) {

    f++;

    box.rotation.x += 1.0 * Math.PI / 180.0;//x軸回りに1度回転
    box.rotation.y += 2.0 * Math.PI / 180.0;//y軸回りに2度回転
    box.rotation.z += 3.0 * Math.PI / 180.0;//z軸回りに3度回転

    // レンダリング
    renderer.render(scene, camera);

    TMan.timer[id].setalerm(function() { Loop(id); }, dt);  //メインループセット
  }

}

</script>

<style>
article, aside, dialog, figure, footer, header,
hgroup, menu, nav, section { display: block; }
#cnv0{
    position: absolute;
    float: left;
    top: 640px;
    left: 20px;
    background:#8080b0;
    border: 2px #000000 solid;
}
</style>

</head>

<body text="black" link="#3333cc" vlink="#663399" alink="#cc0000" bgcolor="#faebf1" background="./img/kumausagineko.jpg">
<font size="3">
<br>
<br>
<b>
<h1>60FPSテスト</h1>
<br>
<div>
<div style = 'width:500px; height:250px; border: 0px; overflow:hidden;'>
  <canvas id="cnv0" name="cnv0" width="500" height="250"></canvas>
</div><br>
<input type='text' id='fps' name='fps' size='16' value='60' readonly> FPS<br>
</div>
<br>
<br>
<br>
</b>
</font>
<br>
<br>
<hr>
<br>
<br>
<a href="./index.htm">戻る</a><br>
<br>
<br>
</body>
</html>
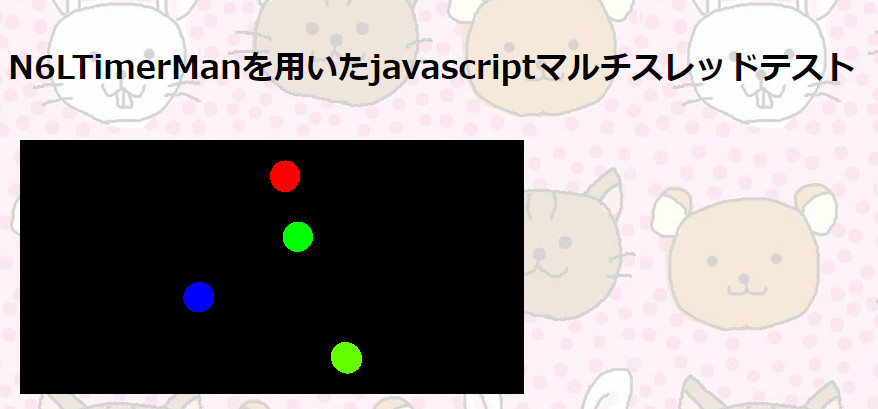
・./mttest.htm(スクリプト部分)
window.addEventListener("DOMContentLoaded", init);
var TMan = new N6LTimerMan();  //タイマーマネージャー
var pos = [ new N6LVector(4, true), new N6LVector(4, true), new N6LVector(4, true), new N6LVector(4, true)];
var th = [0, 0, 0, 0];
var dt = [50, 100, 150, 500];
var spd = 5.0;
var cnt = 0;
var div = 72;
var sph3;

function init() {
  const width = 500;
  const height = 250;

  const renderer = new THREE.WebGLRenderer({
    canvas: document.querySelector("#cnv0")
  });
  renderer.setPixelRatio(window.devicePixelRatio);
  renderer.setSize(width, height);
  const scene = new THREE.Scene();
  const camera = new THREE.PerspectiveCamera(
    45,
    width / height,
    1,
    10000
  );
  camera.position.set(0, 0, 20);

  // 球を作成
  const sph0geometry = new THREE.SphereGeometry(1, 128, 128);
  // マテリアルに色を設定
  const sph0material = new THREE.MeshBasicMaterial({ color: '#ff0000'});
  // メッシュを作成
  const sph0 = new THREE.Mesh(sph0geometry, sph0material);
  sph0.position.set(0, 6, 0);
  pos[0] = new N6LVector([1, 0, 6, 0], true);
  // 球を作成
  const sph1geometry = new THREE.SphereGeometry(1, 128, 128);
  // マテリアルに色を設定
  const sph1material = new THREE.MeshBasicMaterial({ color: '#00ff00'});
  // メッシュを作成
  const sph1 = new THREE.Mesh(sph1geometry, sph1material);
  sph1.position.set(0, 2, 0);
  pos[1] = new N6LVector([1, 0, 2, 0], true);
  // 球を作成
  const sph2geometry = new THREE.SphereGeometry(1, 128, 128);
  // マテリアルに色を設定
  const sph2material = new THREE.MeshBasicMaterial({ color: '#0000ff'});
  // メッシュを作成
  const sph2 = new THREE.Mesh(sph2geometry, sph2material);
  sph2.position.set(0, -2, 0);
  pos[2] = new N6LVector([1, 0, -2, 0], true);
  // 球を作成
  const sph3geometry = new THREE.SphereGeometry(1, 128, 128);
  // マテリアルに色を設定
  const sph3material = new THREE.MeshBasicMaterial({ color: '#808080'});
  // メッシュを作成
  sph3 = new THREE.Mesh(sph3geometry, sph3material);
  sph3.position.set(0, -6, 0);
  pos[3] = new N6LVector([1, 0, -6, 0], true);
  scene.add(sph0);
  scene.add(sph1);
  scene.add(sph2);
  scene.add(sph3);

  // 平行光源
  const light = new THREE.DirectionalLight(0xffffff);
  light.position.set(1, 1, 1);
  // シーンに追加
  scene.add(light);

  //タイマー作成
  TMan.add();
  TMan.add();
  TMan.add();
  TMan.add();
  TMan.add();

  //初回実行
  Loop0(0);
  Loop1(1);
  Loop2(2);
  Loop3(3);
  RDLoop(4);


  function RDLoop(id) {

    // レンダリング
    renderer.render(scene, camera);
    TMan.timer[id].setalerm(function() { RDLoop(id); }, 50);
  }

  function Loop0(id) {

    th[id] += spd * Math.PI / 180.0;
    sph0.position.set(5 * Math.sin(th[id]) + pos[id].x[1], 6, 0);

    TMan.timer[id].setalerm(function() { Loop0(id); }, dt[id]);
  }

  function Loop1(id) {

    th[id] += spd * Math.PI / 180.0;
    sph1.position.set(5 * Math.sin(th[id]) + pos[id].x[1], 2, 0);

    TMan.timer[id].setalerm(function() { Loop1(id); }, dt[id]);
  }

  function Loop2(id) {

    th[id] += spd * Math.PI / 180.0;
    sph2.position.set(5 * Math.sin(th[id]) + pos[id].x[1], -2, 0);

    TMan.timer[id].setalerm(function() { Loop2(id); }, dt[id]);
  }

  function Loop3(id) {

    th[id] += spd * Math.PI / 180.0;

    var col1 = new N6LHsv(0, [255, 255, 0, 0]);
    var col2 = new N6LHsv(0, [255, 255, 0, 0]);
    var col = col1.HsvGrd(div, cnt, col2.ahsv, 1);
    var str = col.Str();
    cnt++;

    sph3.material.color.set(str);
    sph3.position.set(5 * Math.sin(th[id]) + pos[id].x[1], -6, 0);

    var c = (Math.cos(th[id]) + 1.0) / 2.0;
    dt[id] = 50  + c * 450; //50~500[ms]の可変タイマー

    TMan.timer[id].setalerm(function() { Loop3(id); }, dt[id]);
  }

}
var TMan = new N6LTimerMan();  //タイマーマネージャー
var pos = [ new N6LVector(4, true), new N6LVector(4, true), new N6LVector(4, true)];
var th = [0, 0, 0];
var dt = [50, 100, 150, 500];
var spd = 5.0;
var cnt = 0;
var div = 72;
var sph3;
//タイマー作成
TMan.add();
TMan.add();
TMan.add();
TMan.add();
TMan.add();
//初回実行
Loop0(0);
Loop1(1);
Loop2(2);
Loop3(3);
RDLoop(4);
function RDLoop(id) {

  // レンダリング
  renderer.render(scene, camera);
  TMan.timer[id].setalerm(function() { RDLoop(id); }, 50);
}
function Loop0(id) {

  th[id] += spd * Math.PI / 180.0;
  sph0.position.set(5 * Math.sin(th[id]) + pos[id].x[1], 6, 0);

  TMan.timer[id].setalerm(function() { Loop0(id); }, dt[id]);
}
  function Loop3(id) {

    th[id] += spd * Math.PI / 180.0;

    var col1 = new N6LHsv(0, [255, 255, 0, 0]);
    var col2 = new N6LHsv(0, [255, 255, 0, 0]);
    var col = col1.HsvGrd(div, cnt, col2.ahsv, 1);
    var str = col.Str();
    cnt++;

    sph3.material.color.set(str);
    sph3.position.set(5 * Math.sin(th[id]) + pos[id].x[1], -6, 0);

    var c = (Math.cos(th[id]) + 1.0) / 2.0;
    dt[id] = 50  + c * 450; //50~500[ms]の可変タイマー

    TMan.timer[id].setalerm(function() { Loop3(id); }, dt[id]);
  }
window.addEventListener("DOMContentLoaded", init);
var TMan = new N6LTimerMan();  //タイマーマネージャー
var boxies = [];
var renderer;
var camera;
var scene;

function init() {
  const width = 500;
  const height = 250;

  renderer = new THREE.WebGLRenderer({
    canvas: document.querySelector("#cnv0")
  });
  renderer.setPixelRatio(window.devicePixelRatio);
  renderer.setSize(width, height);
  scene = new THREE.Scene();
  camera = new THREE.PerspectiveCamera(
    45,
    width / height,
    1,
    10000
  );
  camera.position.set(0, 0, 20);

  // 箱を作成
  const geometry = new THREE.BoxGeometry(5, 5, 5);
  const loader = new THREE.TextureLoader();
  const texture = loader.load('./img/koala.jpg');
  const textureF = loader.load('./img/koalaF.jpg');
  // マテリアルにテクスチャーを設定
  const materials = [
    new THREE.MeshStandardMaterial({map: textureF}),
    new THREE.MeshStandardMaterial({map: texture}),
    new THREE.MeshStandardMaterial({map: texture}),
    new THREE.MeshStandardMaterial({map: texture}),
    new THREE.MeshStandardMaterial({map: texture}),
    new THREE.MeshStandardMaterial({map: texture})
  ];
  for(i = 0; i < 9; i++) {
    var box = new THREE.Mesh( geometry, materials );
    box.position.set(((i % 3) - 1) * 500, 0, Math.floor(i / 3) * 500);
    scene.add( box );
    boxies.push( box );
  }

  path = "./img/skybox";
  format = '.jpg';
  urls = [
    path + 'px' + format, path + 'nx' + format,
    path + 'py' + format, path + 'ny' + format,
    path + 'pz' + format, path + 'nz' + format
  ];

  tCube = new THREE.CubeTextureLoader().load( urls );
  scene.background = tCube;


  // 平行光源
  const light = new THREE.DirectionalLight(0xffffff);
  light.intensity = 2; // 光の強さを倍に
  light.position.set(1, 1, 1);
  // シーンに追加
  scene.add(light);

  TMan.add();
  TMan.timer[0].setalerm(function() { Loop(0); }, 50);  //メインループセット


  function Loop(id) {
    var i;
    for(i = 0; i < 9; i++) {
        boxies[i].rotation.x += 1.0 * Math.PI / 180.0;//x軸回りに1度回転
        boxies[i].rotation.y += 2.0 * Math.PI / 180.0;//y軸回りに2度回転
        boxies[i].rotation.z += 3.0 * Math.PI / 180.0;//z軸回りに3度回転
    }

    moveobj();

    // レンダリング
    renderer.render(scene, camera);

    TMan.timer[id].setalerm(function() { Loop(id); }, 50);  //メインループセット
  }

}

//オブジェクト位置情報
//位置4*4マトリクス(継続パラメータ)
var A = false;

//速度(継続パラメータ)
var V = 0.1;
var a = 0;
var pyr = new N6LVector([1, 0, 0, 0], true);
var la = new N6LVector(4, true).UnitVec(3);
var up = new N6LVector(4, true).UnitVec(2);

//以上のように初期化してから、下の関数を呼び続ける

//加速度a,(スカラー量)(新規パラメータ)
//ピッチヨーロール(1, θp, θy, θr)(新規パラメータ)
function moveobj() {

  if(!A) {
    var Proj = camera.projectionMatrix;
    A = new N6LVector([Proj.elements[15], Proj.elements[12], Proj.elements[13], Proj.elements[14]], true);
  }

  var B = la.Mul(a);              //カメラ平行移動行
  var az = new N6LVector(la);     //カメラZ軸行
  var ay = new N6LVector(up);     //カメラY軸行
  var ax = az.Cross(ay);          //カメラX軸行

  //カメラワールド行列
  var matWK = new N6LMatrix([B,ax,ay,az]);
  matWK = matWK.NormalMat();

  //ヨーピッチロール回転
  matWK = matWK.RotAxis(az, pyr.x[3] * -1.0);
  matWK = matWK.RotAxis(ay, pyr.x[2] * -1.0);
  matWK = matWK.RotAxis(ax, pyr.x[1] * -1.0);


  //update
  B = new N6LVector(matWK.x[0]);
  B = B.SetHomo(true);
  la = new N6LVector(matWK.x[3]);
  la = la.SetHomo(true);
  up = new N6LVector(matWK.x[2]);
  up = up.SetHomo(true);
  //C = カメラ位置+カメラZ軸+更新されたカメラZ軸
  A = A.Add(B);
  var C = A.Add(la);
  //reset
  pyr = new N6LVector([1, 0, 0, 0], true);

  //set up
  camera.position.set(A.x[1], A.x[2], A.x[3]);
  camera.up.set(up.x[1], up.x[2], up.x[3]);
  camera.lookAt(C.x[1], C.x[2], C.x[3]);
}


/*
function moveobj() {

  if(!A) {
    var Proj = camera.projectionMatrix;
    A = new N6LVector([Proj.elements[15], Proj.elements[12], Proj.elements[13], Proj.elements[14]], true);
  }

  var B = la.Mul(a);              //カメラ平行移動行
  var az = new N6LVector(la);     //カメラZ軸行
  var ay = new N6LVector(up);     //カメラY軸行
  var ax = az.Cross(ay);          //カメラX軸行

  B = B.RotAxis(az, pyr.x[3]);
  B = B.RotAxis(ay, pyr.x[2]);
  B = B.RotAxis(ax, pyr.x[1]);

  la = la.RotAxis(az, pyr.x[3]);
  la = la.RotAxis(ay, pyr.x[2]);
  la = la.RotAxis(ax, pyr.x[1]);

  up = up.RotAxis(az, pyr.x[3]);
  up = up.RotAxis(ay, pyr.x[2]);
  up = up.RotAxis(ax, pyr.x[1]);

  A = A.Add(B);

  var C = A.Add(la);


  pyr = new N6LVector([1, 0, 0, 0], true);

  camera.position.set(A.x[1], A.x[2], A.x[3]);
  camera.up.set(up.x[1], up.x[2], up.x[3]);        // set up
  camera.lookAt(C.x[1], C.x[2], C.x[3]);

}
*/


//キー入力
var KBLock7 = 0;
var KBLock9 = 0;
var KBIntvl = 5;
function chkKeyBoard(){
  if(KeyB.keystate[KeyB.indexof(KeyB.ToReal('VK_N1'))]) {//N1Key
    pyr.x[3] -= 1 * (Math.PI / 180);
  }
  if(KeyB.keystate[KeyB.indexof(KeyB.ToReal('VK_N2'))]) {//N2Key
    pyr.x[1] += 1 * (Math.PI / 180);
  }
  if(KeyB.keystate[KeyB.indexof(KeyB.ToReal('VK_N3'))]) {//N3Key
    pyr.x[3] += 1 * (Math.PI / 180);
  }
  if(KeyB.keystate[KeyB.indexof(KeyB.ToReal('VK_N4'))]) {//N4Key
    pyr.x[2] += 1 * (Math.PI / 180);
  }
  if(KeyB.keystate[KeyB.indexof(KeyB.ToReal('VK_N5'))]) {//N5Key
    a = 0;
  }
  if(KeyB.keystate[KeyB.indexof(KeyB.ToReal('VK_N6'))]) {//N6Key
    pyr.x[2] -= 1 * (Math.PI / 180);
  }
  if(KeyB.keystate[KeyB.indexof(KeyB.ToReal('VK_N7'))]) {//N7Key
    if(KBIntvl < KBLock7) KBLock7 = 0;
    if(KBLock7 == 0) {
      a -= 0.5;
      if(a < -50) a = -50;
    }
    KBLock7++;
  }
  else KBLock7 = 0;
  if(KeyB.keystate[KeyB.indexof(KeyB.ToReal('VK_N8'))]) {//N8Key
    pyr.x[1] -= 1 * (Math.PI / 180);
  }
  if(KeyB.keystate[KeyB.indexof(KeyB.ToReal('VK_N9'))]) {//N9Key
    if(KBIntvl < KBLock9) KBLock9 = 0;
    if(KBLock9 == 0) {
      a += 0.5;
      if(50 < a) a = 50;
    }
    KBLock9++;
  }
  else KBLock9 = 0;
};